
Introduction
Recently, Electron desktop application gets hot and popular among developers. It’s easy for developers to quickly mockup a desktop application and distribute it to three different platform with zero efforts ! (This is really a lie after I made another popular open source project called Kaku with the same tech.)
Ok back to topic, for companies who want to distribute their desktop apps to the world, they must codesign the application first ! The reason why this is important is because if you don’t do so, if the user enable gatekeeper by default, the application will be blocked due to unidentified developer and users will not be able to open it !
So in this article, I’ll try to share some my experiences about how to do the codesign for Mac app and what’s going on behind the problems.
TL;DR
Thanks to Marco Pracucci who wrote some useful details in his post, you can just follow these simple steps to do codesign :
- Get a Developer ID certificate from Apple and install it into your Mac’s Keychain
- Sign your application bundle
codesign --deep --force --verbose --sign "<identity>" Application.app - Verify the signature
codesign --verify -vvvv Application.app and spctl -a -vvvv Application.app
Note: The identify here is the id wrapped inside the parentheses that you can get from keychain like the screenshot below:

But … the world sucks
The first problem I have encountered is version problem.
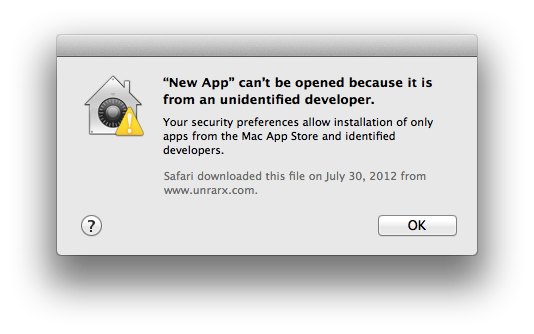
After codesign the app on my laptop (running 10.11.4) and share this app to my team members to test with, for those who are using 10.10.x, they will not be able to use the app and the gatekeeper’ll keep complaining something like the image below :

But for the others who are using 10.11.4, the app is working well on their laptops (WTF???)
After googling a while, I finally found a discussion thread here on GitHub talking about this ! If you codesign your application on 10.11.4 , you’ll successfully get it codesigned and usable BUT for users who are using 10.10.x (to be specific those who use laptops <10.11.3) will have problems when opening that app.
From the discussion thread, we can learn that there are something changed from 10.11.3 to 10.11.4. If you want to hack that around by yourself, you’ll need to follow the steps here. But for me, I use electron-packager, so if you are using that too, you can just upgrade to 6.0.0+ because they already handle that for you on that version with zero efforts !
How to verify your app
- codesign
- This tool is not only for doing the codesign, but also you can use it to verify whether it’s well signed or not. After running it, you can get things like this :
https://gist.github.com/EragonJ/cc16613280384b0bf4bda36f1e761171
- spctl
- For this tool, this is mainly used to see whether your codesigned application will be blocked by gatekeeper or not, if you didn’t get anything wording like accepted, your application will always be blocked or treated as damaged by gatekeeper, so it’s really important to use this tool to do the check every time when you create the new application.
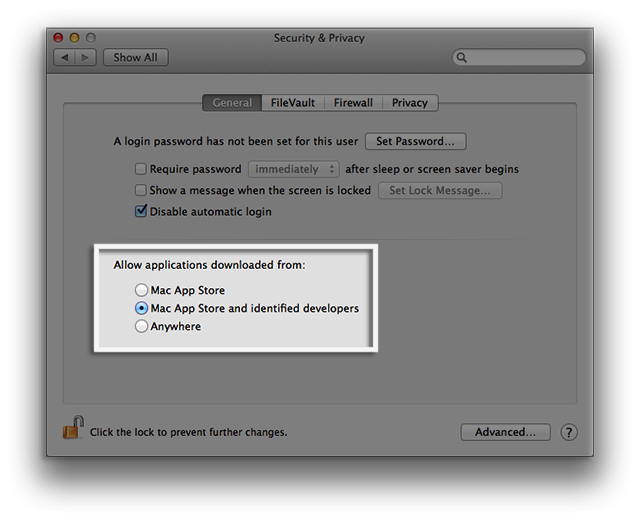
- Note: If you are using Apple Developer ID certificate to build you application and be distributed by yourself, Remember to change your [System] > [Privacy] to “Mac App Store and Identified developers. Otherwise, you will keep getting rejected information.
https://gist.github.com/EragonJ/36f31b2b1f0659e95ef4fdab6b2e9a02
How to test
You can check details here from Apple’s documentations, but I’ll still copy some here.
- To disable Gatekeeper using the spctl command
$ sudo spctl --master-disable
- To confirm that Gatekeeper is enabled using the spctl command
$ spctl --status- If enabled, you will get assessments enabled
- If disabled, you will get assessments disabled
- To test your Developer ID-signed app
- Make sure your gatekeeper is enabled by follow above ways.
- Email your Developer ID–signed app to yourself and use the copy that Mail downloads to trigger the dialog.
- Host your Developer ID–signed app on your own local or remote server and use the copy that Safari downloads to trigger the dialog.
- By doing so, your gatekeeper will be triggered correctly !
Troubleshooting
A) My certificate on keychain keeps showing expired
This problem is critical and annoys developers who are not familiar with Apple certificate things (like me !) When working on the codesign feature, I noticed that no matter how hard I re-install the certificate that I download from Apple, it will keep showing expired with no reason !
After trying and discussing this with one of my iOS friend, we finally realized it’s related to this notice ! For someone (not sure who, but including me), the Apple Worldwide Developer Relations Certification Intermediate Certificate is going to expire on Feb 14, 2016 which will cause the problem to make your certificate keeps expired.
What you need to take action here is to renew the this core certificate and try to re-install (or re-create) your developer certificate again and things will be solved … WTF !!
B) Where to find my certificate ?
For most of people, if you are writing desktop application by Electron, normally you’ll distribute your application by yourself (like us). But, I noticed that it’s really frustrating to figure out how to get that Developer ID Certificate !!
I have tried several times from https://developer.apple.com, but there is nothing related to Developer ID Certificate (or maybe it’s mainly because I am using different role, so it’s not showing up ?) ! After reading tons of articles, I finally realized that it’s inside Xcode !! You can check the screenshot below :

But you can notice that the buttons are grey and is not clickable. That’s mainly because the role is wrong !! Even if you are admin role, you still can’t generate that ! Only Team Agent can do that ! So if you are developer or admin, Go ask your leader for that and tell him/her to press the button above to create the certificate for you.
After getting the certificate (it will be name like this xxxxxxx.p12), you can just double-click the file and install into your keychain. Remember, always keep them private 🙂
Note: Only the first one who made the certificate and uploaded to Apple Developer can have this .p12 file. This will only exist on his own keychain and you can’t even get it from Apple Developer. So remember to ask him to export that p12 file and share with the whole team ! Remember, if you lost this .p12 file, no one can save you and you need to regenerate another certificate again.
Last few words
It’s really a hard time to fight with codesign stuffs especially there are less resources talking about this. But whatever, I wrote them down already !! If this article does help you, please feel free to share !
And also, if there is anything wrong or missing in the article, feel free to tell me and I’ll update it ! See you guys next time 🙂

