[FxOS] Settings App – Call Settings

Call Panel

Screenshots

F1C9BD08-E0FE-4327-8D41-0289D3357DC9

Call Panel

Introduction

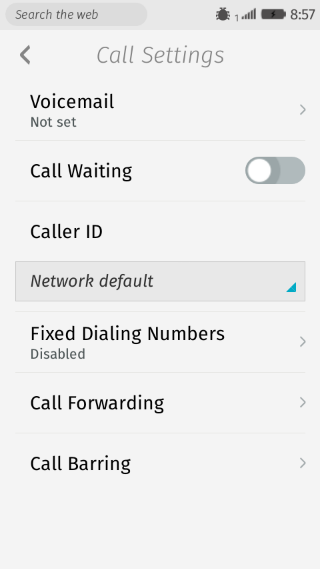
Call Settings is one of the most important panel that can let users highly customize their own call related settings like Call Waiting, Call Forwarding … etc. (We will cover each part later) Based on the screenshot above, you can see that for this panel, it’s more like an entry point for every panel and also it will display some useful information taken from hardware.

But when you navigate from this panel to others and navigate back, you may notice that some menu items are disabled at first and you can’t manipulate that. This is not a bug but also quite a feature. By doing so, we can make sure that each time when displaying them, we will always use latest value from hardware to make sure we won’t display some outdated information to mislead users.

Call Voice Mail Settings Panel (Dialog)

Screenshots

7E8274FF-D506-492F-9457-B42CA6A4C049

Call Voicemail Panel

Introduction

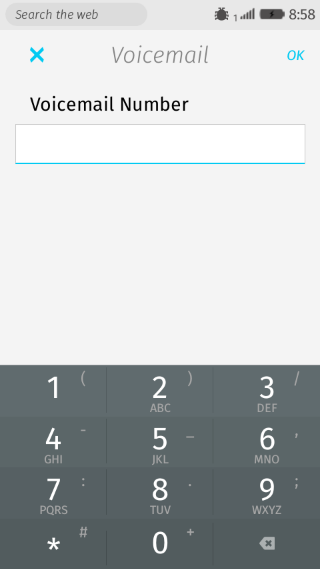
For every simcard, there must be a special number that you can dial to set your voicemail number and this is why we need this dialog in Settings App. When showing this dialog, it will try to get preset voicemail number in mozSettings db and show it at first. Here, you may get confused why it can get the right number from db, this is because in settings/js/panels/call/panel.js, we also need to show voicemail number on the menu item, so when trying to initialize the item, we will check whether there is any provided number from mozVoicemail API and store it into db, so that’s why in this dialog, you can get this value from db.

Call FDN Settings Panel

Screenshots

28B3155B-DB63-4498-9586-101599D1A41A

Call FDN Settings Panel

0B2234D7-091F-4ACA-9497-9FBB3D0AC630

Enable / Disable FDN

Introduction

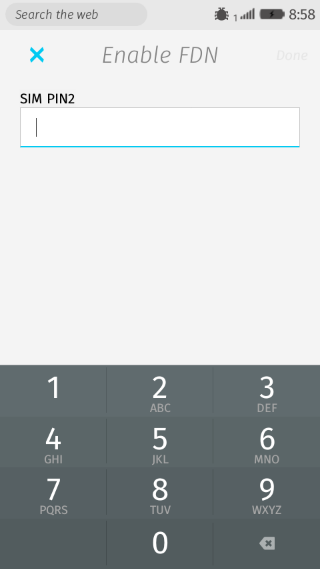
This panel is also an entry point that we can set settings related to Fixed Dialing Numbers. Here, we provide a toggle that you can enable / disable this feature. When clicking on the toggle, it will trigger DialogService to show SimpinDialog which is responsible for all Simpin related operations. This feature will only be enabled / disabled when you successfully type your PIN2 correctly in the dialog.

Call FDN List Panel

Screenshots

8A1982D3-2ACC-46D7-BC38-05E587BD17D2

Call FDN List Panel

568610E8-C6ED-46F5-B2BB-01F1940DAF78

Popup menu when clicking on FDN number

Introduction

Here, in this panel, we will list down all preset FDN numbers in the list. When clicking on any number, we will show an popup for it and you can decide whether to call, edit and delete or not. Same with enable FDN, if you are going to do any operation I mentioned, we will use DialogService to show SimpinDialog to confirm this operation.

For any FDN number, they will all be stored inside your simcard. Sometime, based on your simcard, you may have an upper bound for the number of FDN numbers, but this depended on operators so the number may vary. So, if you hit an error message when creating a new number, you may go into this situation.

Call FDN List Add Panel (Dialog)

Screenshots

10125634-9757-44FA-82A4-252CF2A3B4E9

Call FDN List Add Panel (add mode)

DFD4AD2B-5B62-472F-BB03-5C5062C98E83

Call FDN List Add Panel (edit mode)

Introduction

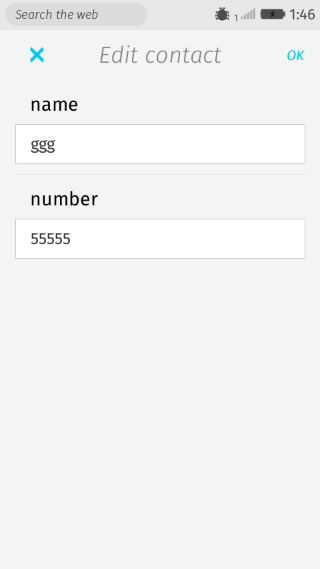
When clicking on the Add button in Call FDN List Panel, this dialog will pop up and ask users to input preferred name and number for this set of FDN number. Instead of adding, this dialog is also can be reused for editing. Normally there is no specific validation rules for these two fields in our codes, instead, we will pass wrapped object from FdnContext.createAction and pass it to SimpinDialog, it will directly communicate with operator and if there is any error coming up, we will directly report it and display to users.

Call Forwarding Panel

Screenshots

6964464D-617A-4356-8CC4-5E39FADF56E6

Call Forwarding Panel

Introduction

Honestly, Call Forwarding can be the most complex panel in Call Settings (especially before it was refactored), so let me briefly tell you a story behind this panel.

When users click on any menu item and type number for any Call Forwarding option (For this part, please check Call Forwarding Details section), after submitting, we can get wrapped results from the dialog and use call/call_forwarding.js to help us handle this object. After doing some tests, it seems that it is not able to do multi tasks when interacting with Gecko’s API (This should be the problem in modem). So, in order to make anything works perfect, we create another module called CallSettingsTaskScheduler (call/call_settings_task_scheduler.js) inherited from TaskScheduler (modules/base/task_scheduler.js).

TaskScheduler is obvious responsible for handling different tasks and make sure they are all scheduled and can be executed one by one without conflicting each other. While for CallSettingsTaskScheduler, it is just an extended class with some customized TASK_TYPE and error handling.

So back to topic, because we aren’t able to do more than one request on modem each time, we need the help from task scheduler to achieve this. This operation includes get and set, so they all should be scheduled. If we don’t do this in order, modem will directly throw out errors and our request would be dropped and this would make our state inconsistent with hardware.

In addition to this, there is also another special feature that TaskScheduler provides – if there is another same-type task coming up, we will remove queued same-type task and push the new on in the array. By doing so, we can make sure we won’t send outdated request and would always keep the latest one.

And for UI, when modem is busy on handling our operation, we should disable all UIs while normal, we should make them back. So, in panel, we will observe CallForwarding’s internal _state to lock / unlock UI.

For anything else, please check our script.

Call Forwarding Details Panel (Dialog)

Screenshots

CF3AF5AE-E101-4564-B490-624B24F61061

Call Forwarding Details Panel (Dialog)

Introduction

This is the dialog that you can set any number on each Call Forwarding option. Right now, because we do support 4 different options for Call Forwarding but with the same UI, we will reuse this dialog for all of them instead of duplicating many codes. But basically, there is no much logics hidden in this dialog and all what it does is pass the result back to Call Forwarding Panel (Caller) and the caller will do following operations based on returned values.

For more details about how Call Forwarding works internally, please check Call Forwarding Panel section for more details.

Call Barring Panel

Screenshots

5E57AD2D-F02A-46F9-9647-098B898D4993

Call Barring Panel

Introduction

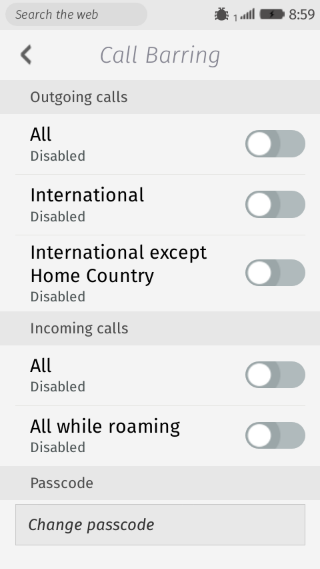
In this panel, you can restrict certain types of outgoing calls and incoming calls. There are no special logics handled in this panel and this can be treated as a toggle that helps you customize your Call settings.
[FxOS] Settings App – SimCardManager

Simcard Manager

Screenshots

root2

Root panel

SimcardManager2

Simcard Manager

Introduction

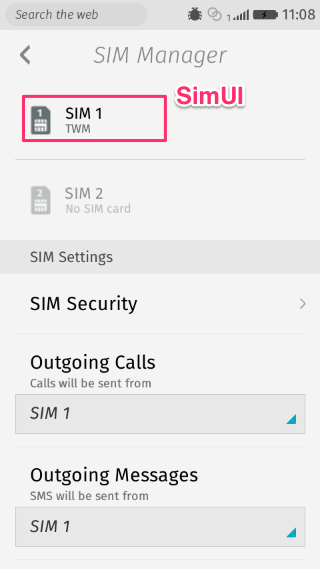
After 1.4+, FxOS has started to support DSDS (Dual Sim feature) that you can insert 2 simcards into your FxOS device. By default, because FxOS is a unified OS that should be used in different devices, we will automatically hide this entry point by default if there is no more than one physical simcard slot.

If you check source codes in settings/js/panels/simcard_manager, you would notice that we have sim_ui_model.js and simcard_manager.js. Let me briefly explain the responsibilities of these two different scripts below.

For SimUIModel, this is a abstract interface between hardware information and our UI. Based on UX’s spec, there are so many different scenarios that we have to show / hide some parts of UI like simcard is not inserted, simcard is locked, simcard is blocked …etc. So, that’s why we need SimUIModel to control every sub-states.

While for SimcardManager, it will bridge the internal state of SimUIModel and real UI to make sure what should be hidden and what should be updated. In addition to this, SimcardManager also needs to watch some hardware events (like AirplaneMode, cardstatechange … etc) to update its UI to make sure they do reflect the real status.

In SimcardManager, there are three important select/option called Outgoing Calls, Outgoing Messages and Data. For some apps (like dialer), they will watch these mozSettingsKey to show / hide some hints to users, for example, if you choose Always Ask for outgoing calls, every time when you are trying to dial out a number, it will keep popping up a simcard picker UI so that you can choose which number you are going to use to dial.

But, there is one black magic that you need to keep in mind when you are dealing with these three select/option. In system app, there is one file called sim_settings_helper.js which does lots of works with these three options. Based on UX’s spec, there is a special request that we have to automatically switch options if from 2 simcards to 1 simcard. Interestingly, because from Gaia (including Gecko) aspect, we can’t directly make sure the second card is indeed inserted (We did encountered one edge case that one of colleague’s old simcard is hard to be recognized by our hardware and it takes more than 3 ~ 5 seconds to get its information from Gecko), due to this, sim_settings_helper.js will wait for upcoming event – simslotready from simslot_manager.js to make sure we did wait longer enough for the second card, and we can based on current situation to decided whether to switch option to another card or not.

[FxOS] Settings App – Wifi

Wifi

Flowchart

Wifi-4

Wifi Panel

Screenshot

44890310-4321-4780-B47D-7C55F31C131E

Wifi Panel (A)

208C8D9A-B39D-4A81-A6C3-19DBAEC8259D

Wifi Panel (B)

Introduction

Wifi panel is the main entry point for the other dialogs / panels. As you may see on the screenshot above, in this panel, users can turn on / off Wifi, decide which AP to connect with and manage certificates or whatever settings related to Wifi.

If you check settings/js/panels/wifi/, you will notice a script which is called wifi_network_list.js. This script is so important that we will use it to generate a list of APs that users can interact with. For example, if you click on any listed AP, it will automatically check its own encryption to show which kind of dialog or just connect to that AP directly.

In addition to this, it will also automatically check its current status from Gecko to see whether it should update its signal / wording … etc. By doing so, we encapsulate all logics within this list and caller doesn’t have to know these details when using it.

Wifi WPS Panel (Dialog)

Screenshot

C6FBDCA2-D54B-4D51-90DC-FDEFA73CEE12

Wifi WPS Panel

Introduction

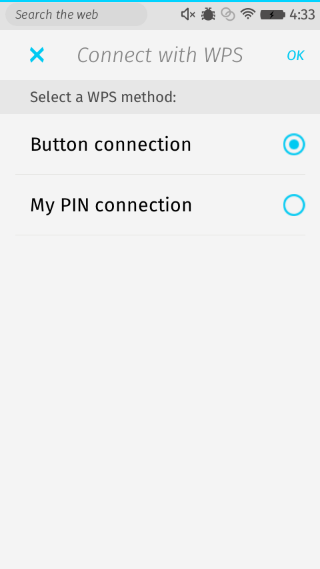
WPS is another way to connect to AP but this needs some special support from it to make the functionality work. If your AP does support this, users can click on Connect with WPS button to select which way to use to connect with WPS.

From Gaia side, there is no much works here and we simply provide a basic UI for users to choose and configure. So for more details, please go check Gecko’s source code for this part.

Wifi Status Panel (Dialog)

Screenshot

C5B6EB09-BA07-4D67-8684-AD4DDC662D62

Wifi Status Panel

Introduction

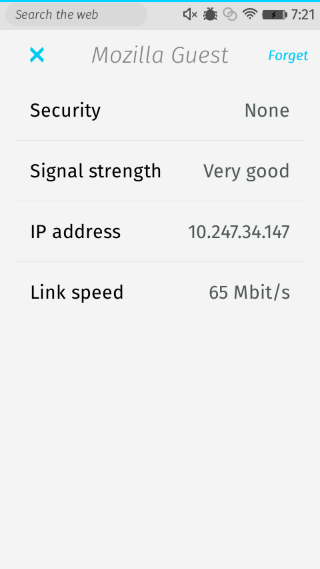
When clicking on connected AP in Wifi Panel, this dialog would be popped up to tell users all needed information about this AP including Security, Signal strength, IP address and Link Speed. In addition to this, you can also forget this AP by clicking right-up button.

Wifi Auth Panel (Dialog)

Screenshot

A13A9735-54E0-46A8-9002-688E15DC8097

Wifi Auth Panel

Introduction

If users click on non-connected and encrypted AP from Wifi panel, we will pop up Wifi Auth Panel to users. Compared with non-encrypted AP, normally users have to type password or do some extra pre-settings to connect to this AP.

Wifi Manage Networks Panel

Screenshot

AE570F39-07F3-41A8-BC11-5A02C01939A2

Wifi Manage Networks Panel

Introduction

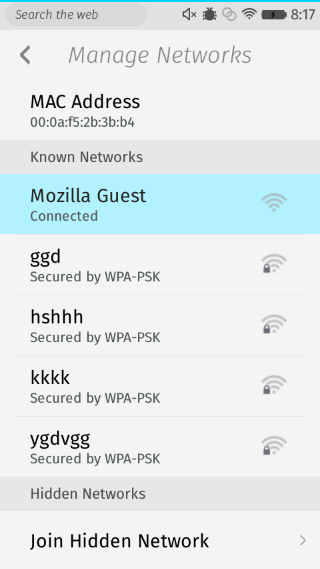
In this panel, we will list down all connected AP here. If users click on the item, the confirm pop-up will be shown to double confirm whether they really want to remove forget connected AP or not. So for this panel’s code, there is no much complex works but only some UI related stuffs.

Wifi Join Hidden Panel (Dialog)

Screenshot

F8F1053A-C63E-4ED6-804A-596755C6F966

Wifi Join Hidden Panel

Introduction

This panel is pretty simple enough and it will transform all user’s input into a recognizable object for WifiManager. But there is one thing that should be noticed. Because there are some shared UI / logics for users to select security, EAP method … etc across panels (Wifi Auth Panel & Wifi Join Hidden Panel), we have to use a shared script to control them.

But, sadly, because there are still some minor difference between these two pages, in shard script, we will check some element’s existence before manipulating. So please remember to double check UI codes and shard script for this part before adding new rules. Otherwise, you may break another panel.

Wifi Manage Certificates Panel

Screenshot

CAF97E29-4E6B-4921-A4E9-D302DD874DC3

Wifi Manage Certificates Panel

Introduction

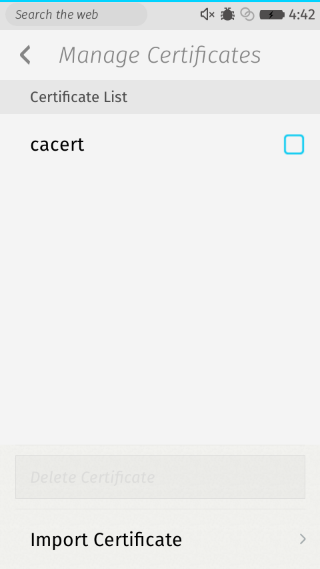
If users are trying to connect with AP with WPA-EAP encryption, under some special EAP methods, they need users to provide needed Server Certificates and User Certificates for authentications.

So, if users are trying to connect to AP with these EAP methods, they have to go to this panel and import needed certificates first, otherwise, we can’t find out needed certificates when users are trying to join hidden network.

Wifi Select Certificate File Panel

Screenshot

2E3A5B59-0C08-444B-A12F-AEEDAA211886

Wifi Select Certificate File Panel

Introduction

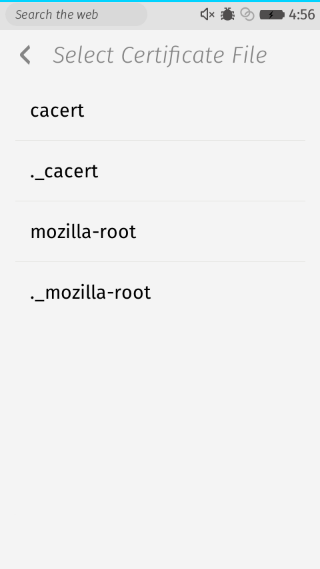
In this panel, we will list down all possible certificates from SD card and present them to users. When clicking on these items, we will redirect them to Wifi Enter Certificate Nickname Panel.

Wifi Enter Certificate Nickname Panel (Dialog)

Screenshot

D1A80F77-1DC3-42E8-AC72-B6FC88C65FA0

Wifi Enter Certificate Nickname Panel

Introduction

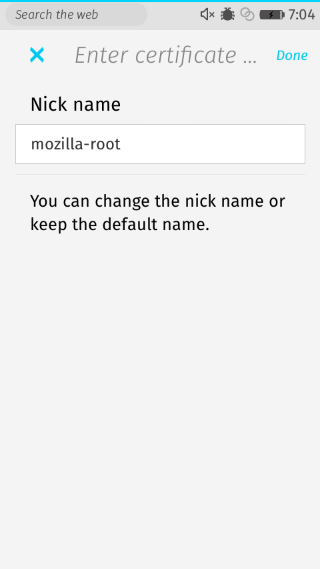
After selecting needed certificate from Wifi Select Certificate File Panel, users will be redirected to this dialog. In this dialog, users can decide whether to rename this certificate or not. Interestingly, if you already have one certificate named with the same name, you are not allowed to name it again because Gecko would throw out some error in this special case.

[FxOS] Settings App – AirplaneModeHelper

AirplaneModeHelper

Flowchart

AirplaneModeHelper

Screenshots

root2

 Setting’s root panel

Introduction

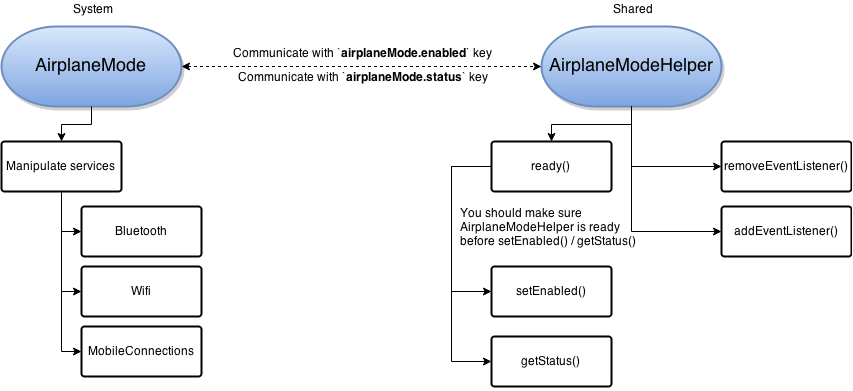
For developers, AirplaneMode is a complicated service that has deep relationships between different services like Bluetooth, Wifi and MobileConnections. Because these services are all related to hardwares, there must be some round-trip time that you have to wait. In order to make these operations encapsulated, they are all handled in system/js/airplane_mode.js. and we think the other apps should just use a trigger to tell System app to do following works.

But due to the restriction that we can’t easily communicate across apps easily, we have to use some internal settings key to communicate. But in order to make sure other apps won’t directly manipulate the communication key that would break the other apps, we think the better way is to design an unified helper for everyone to use, and all these details will be hidden within APIs which it exposes and that’s why we need AirplaneModeHelper (its abbreviation would be AMH, and related file would be shared/js/airplane_mode_helper.js).

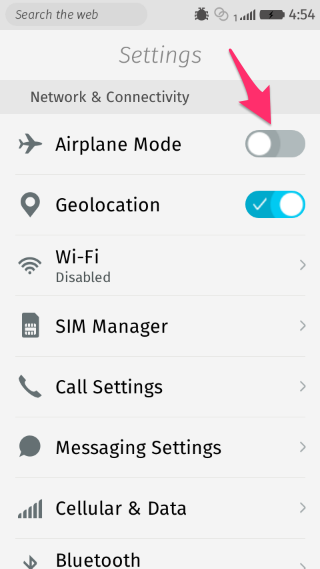
If you check below flowchart, you can notice that there are some useful API like ready(), setEnabled(), getStatus(), addEventListener() and removeEventListener() that you can use to build up your business logics. Take Settings app for example, there is a toggle in its root panel and users can click on it to enable / disable AirplaneMode, we use AMH to manipulate it and make sure we will block UI when enabling/disabling and unblock UI when enabled/disabled.

So with AMH, you can do whatever you want which relates to AirplaneMode, while for more details, please check its source code and flowchart below.

[FxOS] Settings App – DialogService v.s. DialogManager

Image Credit

settings

DialogService

Flowchart

DialogService-3

DialogService focuses on controlling states between dialogs, it will make sure every time there is only one dialog showing up on the screen and for the others, they will be queued as an internal state and will be executed one by one when current dialog is dismissed.

Right now we support 4 different types of dialogs, AlertDialog, ConfirmDialog, PromptDialog and PanelDialog in DialogService.

For the previous three dialogs, they are used as a substitution of native alert, confirm and prompt API with predefined layout based on UX’s spec. While for PanelDialog, you can define your own dialog with pre-defined interface and DialogService will help you show it with all necessary callbacks are bounded on UI.

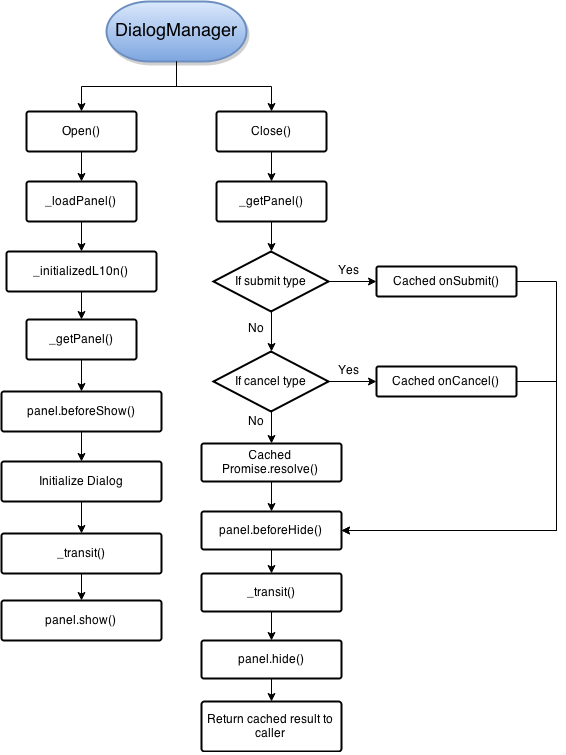
While for lifecycle of dialogs, they are all handled in DialogManager and please go check related documentation for this part.

DialogManager

DialogManager-2

DialogManager is a manager that mainly focuses on controlling the whole life cycle of each dialog. It will load panel, initialize panel, use pre-defined transition to show panel when DialogManager.open() is called. While for DialogManager.close(), it will find out which panel is going to be closed, validate the result of onSubmit() or onCancel(), and use pre-defined transition to hide panel.

Basically, this DialogManager will be only used accompanied with DialogService. If you want to know more details about how they are communicated with each other, you can go check settings/js/modules/dialog_service.js for more details.

[FxOS] Settings App – Dialog v.s. Panel

fxos

In Settings app, we have two different concepts – one is Dialog while the other one is Panel. The main difference between them is how they are presented. From UX spec, if we need users to do some actions and then submit, normally they will be presented with Dialog with cancel and submit button. While for Panel, it is just a simple view that focuses on presenting data and basically you can notice that there is always a “<“ backward arrow in the header that can help you navigate back to previous panel.

63BF65E7-D01A-4934-B67B-D396E067C044

Wifi Auth Dialog

C2C748FE-3B37-4CF1-A0B4-C96DE1767C15

Wifi Panel

If you are going to create a dialog, here comes some notes that you need to be aware of at first. Let’s use Wifi Auth Dialog for example :

[Setup]

  1. You have to register one section element in Setting’s index.html.
    1. <section is=”wifi-auth” role=”region” id=”wifi-auth” class=”dialog”></section>
    2. remember, you need to add one extra dialog class to make sure the section can be applied with right CSS style
  2. Remember to add one more link element in index.html to make sure related sub-document will be loaded.
    1. <link rel=”import” href=”/elements/wifi_auth.html”>
  3. And then, you can follow scripts under settings/js/panels/* to make sure all dialog needed codes can be loaded.

Take settings/js/panels/wifi_auth/panel.js for example, for Dialog, there are some special API you can use and something that you need to know.

  1. In order to pass data back to caller, you can use onCancel and onSubmit function with resolved data. By doing so, caller can use DialogService.show(‘panelId’).then(function(result) {}); to get needed data.
  2. And also, if you want to programmatically cancel or submit, after Bug 1166495 is landed, you can use this.cancel() and this.submit() to achieve this.

For Panel, you can follow [Setup] part above without adding extra class and everything is done ! Based on our design, they share the same interface and there is no much difference between them, just make sure you won’t use onSubmit(), onCancel() and Dialog related API described above, then you are good !

[FxOS] Why we need to squash commits ?

This is what I found in our Taipei office “Squash bugs for a better (Life) Web”

squash

Concepts about version control

When using version control tools like githg … etc , we all have one common concept in mind that we have to commit often to make sure all stuffs can be tracked and understandable when reading histories. By doing so, sometimes we may break a bug to many chunks and this would make us hard to track at the first glimpse. All you can do is trying to find the first commit about the bug and keeps reading commit by commit to know the whole story.

For personal / small project, I think this is ok. But for a big project like Gaia or some other open source projects, this would not be a good idea to do so.

In Gaia

Go check Gaia repository first, you will notice there are more than 35,000 commits and 470+ contributors in this project. To be honest, this is really a huge repository. There are so many people working at the same time in different timezones trying to make FirefoxOS better, so there must be really hard to control. But after being part of Mozillian, I finally understand how they try to maintain it.


commit

Our latest commit history

As you may see, for us, each commit will be reflected to one bug with bug number on the title. By doing so, we can easily understand what this patch is for and what it is going to fix. With bug id, I can easily search Mozilla’s bugzilla to understand the discussion histories and design specs there.

In addition to this, if each commit is mapped to each bug, then we can easily revert any patch that broke Gaia! For example, you can check the picture and notice that there is a revert commit made by crh0716. That’s because the patch broken something in Gaia, anyone can go ahead and find out the patch then back it out !

It’s amazing, isn’t it ?!

So, how to squash commits !?

If you read this line, it means you did read the whole article and want to know something about this ! From my experiences, I noticed there are less people knowing how to do this (I met few contributors and they all messed the git history up in the end xD ! It happens every time LOL).

So, I made a quick screenshot to help you understand how to do this. Just to remind you, there may be some other ways to achieve this, but this is how I do in my daily life.

Hope this helps ! And any feedback or comment is appreciated ! Cheeeeeers !

https://asciinema.org/a/11269.js

[Git] How to maintain a huge and long-lived branch

pr

Story

Currently I am maintaing a god damn long-lived and huge branch on my local and for me, this is xxxx annoying -_-. Here comes a tip first, please make sure to break down your patch as much as you can. For me, this patch looks kinda independent and tiny enough, but I am wrong in the end.

As you can see, this branch has changed almost 60 files in the codebase and change of LOC has increasing to 5000 ! So, you can definitely guess that there must be so many conflicts happened especially Mozilla/Gaia is such a huge open source project and is contributed by lots of hackers from different timezones in this world. Based on my observations, it can hit more than 5000 LOC changes like features, bugfix … etc per day !

But, this case helps me to get familiar with how to keep your branch up-to-date with main trunk and I already came up with a small SOP to help me on this. In order not to forget this important experience (I don’t think I will forget xD), I would write them down about how I made it.

SOP

  • git checkout -b bug-973466-backup-20140619
    • Make sure to backup one copy of your current branch in case of something broken when rebasing. In my case, because I have to keep it up to date with main trunk all the time, it would be better for me to use Date format to make it readable and easy to identify.
  • git checkout bug-973466
    • Jump back to current branch
  • git rebase master
    • Rebase your code onto master to keep updated with it
  • Solve conflicts
    • You will find so many conflicts in this stage, and please don’t be afraid, use github / git diff / vimdiff or anything whatever to make sure there is nothing broken in this stage and both of theirs and ours changes are still there.
    • If you got lost in this stage, just did git rebase --abort to exit the process and there is nothing influenced ! Yeah.
  • If you successfully solve conflicts and nothing is wrong, it’s great ! You are free now !
  • If you found something wrong later after rebasing, it’s too late to recover, that’s why we need a backup ! Just remove your current branch and replace it with backup one, nothing is broken now ! Nice !

Some thoughts

  1. Don’t make your branch huge and try to break it down to smaller parts.
  2. If your current move is danger and hard to recover, always remember to make a backup.

Hope these information helps ! Any idea or feedback is welcome !

[FxOs] Inter App Communication

之前投了一篇稿在 Mozilla TW 的謀智台客,主要是在探討 FxOS 如何透過 IAC 在 App 間溝通資料,廢話不多說,請看:

iac

在開發 App 的時候,我們有時候需要在App之間傳遞資訊,而今天我們要介紹的主角就是新引入的 WebAPI: IAC (Inter App Communication),有了這個好東西,我們就可以輕易的在 App 間傳遞訊息,以下就用筆者遇到的例子來說明吧:

User story

當使用者拿到 Firefox OS 手機,第一次開機的時候,會自動先開啓 FTU (First Time Use) App 作導覽。當導覽進行到最後一步的時候,會看到這個畫面,可以按下「Home」鍵回到主畫面。

ftu-mobile-627x1024

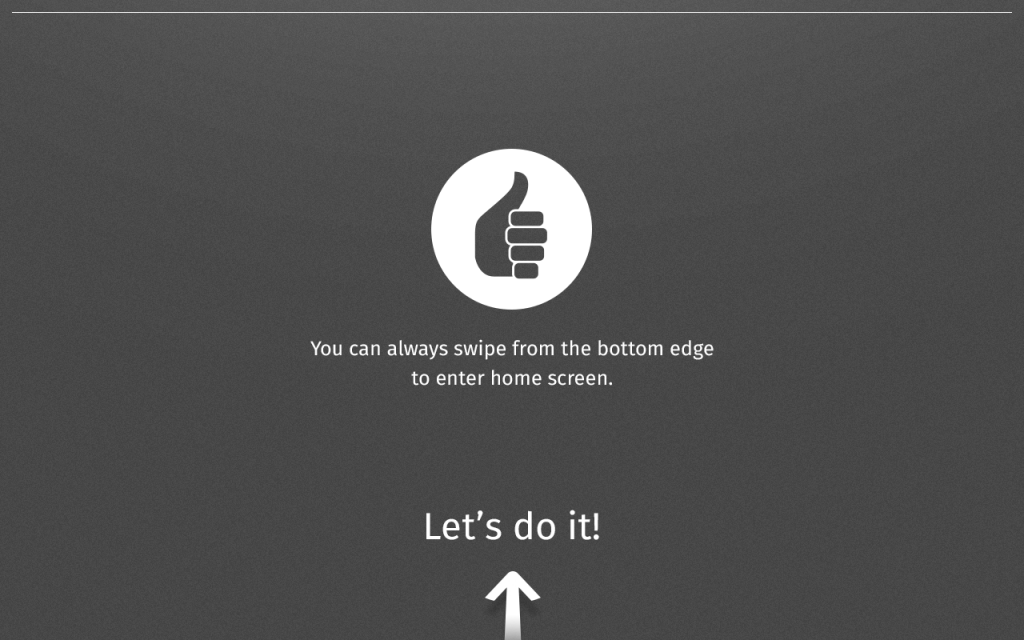
而在 Firefox OS 平板上,最後一步的導覽畫面會是這樣,但是改透過由螢幕下方往上滑動的手勢回到主畫面:

ftu-tablet-1024x640

大家可能還不是很明白為什麼這個 User Story 下面要使用 IAC,讓我解釋一下。因為在手機剛啟動的時候,我們的 FTU 是一個獨立的 App,而這個 App 是被 System App 所呼叫起來的,兩個 App 之間如果需要溝通,就需要透過 IAC 來傳遞資料。

之所以 FTU App 需要跟 System App 做溝通,是因為「使用者在 FTU 導覽過程中,是無法按 Home 鍵離開的」,但很不巧的這個需求在 Firefox OS 平台是 Tablet 的時候反而變成是一種限制,怎麼說呢,因為對 Tablet 來說,我們並沒有實體的 Home 鍵,因此「Swipe 向上的手勢」就被我們定義成「使用者按 Home 鍵」,但是在先前 Mobile 的需求下,使用者在 FTU 是不允許按 Home 鍵的!!因此這就產生了一個問題,我要怎麼判別使用者現在的情境是:

  1. Tablet 使用者
  2. FTU 已經導覽到最後一步
  3. 使用者可以透過螢幕下方往上滑動的手勢(等同按 Home 鍵)離開 FTU App

這個時候…我們就需要 IAC 的幫助!

IAC , we need your help

這邊要解釋一下 FTU App、System App 及 IAC 的角色。

FTU App 的功用主要是在教導使用者如何初始設定 FxOS 及透過 step by step 的教學來了解如何使用 FxOS 的裝置,所以他可以知道使用者目前的 step 到哪個階段了。

System App 在這裡的功用是在處理使用者按下 Home 鍵時要處理的事情,他只知道目前使用者是不是按下 Home 鍵(在 Tablet 就是 Swipe 向上的手勢),然後依照各個平台做相對應的事情。

而 IAC 的角色就是 FTU App 及 System App 溝通的橋樑,因為 System App 不知道目前 FTU App 是不是到了最後一步,所以自然就無法解除阻擋 Home 鍵這件事情,所以在這個 User Story 下,當使用者來到最後一個 Step 的時候(而且是在 Tablet 的平台),FTU App 就會透過 IAC 和 System App 溝通,然後請求 System App 可以讓我們以透過 Swipe 向上的手勢(等同按 Home 鍵)離開 FTU App。

在 Gaia 我是這麼做的:

In FTU App :

https://gist.github.com/EragonJ/7986909.js

從程式碼中可以看到我們透過 app 實體去連接一個 keyword(在這個例子中就是 ftucomms),FTU App 跟 System App 之間就是透過這個 keyword 來當做識別並透過 port 來溝通,我們只需要把東西通通塞進 port.postMessage 做雞精就對了!

聰明的你可能會問,所以 App 只需要隨便用個 keyword 就可以連結並傳東西嗎?當然不行,接收訊息的 App (傳送訊息的不需要)還需要去它的 manifest.webapp 設定如下:

https://gist.github.com/EragonJ/7986929.js

這樣子我們 System App 就可以接收來自 FTU App 的訊息了!在 System App 只要我們確定傳送進來的 message 是我們當初預期的 ‘done’ 就可以放行讓使用者可以透過 Swipe 向上的手勢離開 FTU App 了!

不過你可能又會問我要怎麼讓 System App 來接這個訊息呢,這是個好問題。如果你需要透過 IAC 來做資料傳遞的時候,你需要使用 mozSetMessageHandler 來掛載相對應的 Handler。

下面是 IAC 的基本使用方法:

https://gist.github.com/EragonJ/7986936.js

但是要注意的是因為這個 API 只會執行最後一個掛上去的 Handler,所以當你一個 App 要做多組 IAC 資訊傳遞的時候就需要自己做額外的處理。

但在寫程式的時候沒注意到件事情,所以當時 Music App 的另一個 contributor – Jim Porter 同時也自己在 System App 建立了一個 Handler,而我的 Handler 又是在他建立之前建立的,因此所有我 FTU 有關的 Handler 不會執行到,因為通通都被它的 Handler 蓋過去了。

所以為了讓後面的人不要發生這個問題,之後就和 Jim Porter 討論出一個 IACHanlder,每個 App 只要引入這段 javascript ,我們就會自動幫他建好一個共用的 Handler,所有的資料都是這個 Handler 統一管理,然後以一個固定的 naming 用 Custom Event 的方式傳播出去,讓有需要的人可以自己接 Event。(有興趣了解實作的人可以看這裡

所以最後 System App 只要用這樣簡單一行程式碼就可以接 Event 然後做解除限制的動作了:

https://gist.github.com/EragonJ/7986944.js

是不是很簡單呢!希望這篇能夠幫助到也需要使用 IAC 的開發者朋友哦 🙂

參考資料: Inter App Communication wiki 文件

[FxOS] a quick overview of Firefox OS

gecko

(這是我在育樂街發現的新店叫做 Gecko xD)

2013/11/29 在台南成功大學的演講,題目是和 Firefox OS 有關的 overview。來的人很多,說實在真的也很緊張,還好有提前半小時來測試環境才知道原來計中的 Firefox 是用 19 版的 … 現在最新的都是 25 版了,難怪 Firefox OS simulator 跑不起來,真的是還好有先測試,要不然就要出包了 …

很感謝 Timdream & Fred 給我這個機會下台南演講,真心希望學弟妹能夠從中得到些什麼,也期待未來大家再相見的一天 xD

附上當天的 slide :

//speakerdeck.com/assets/embed.js