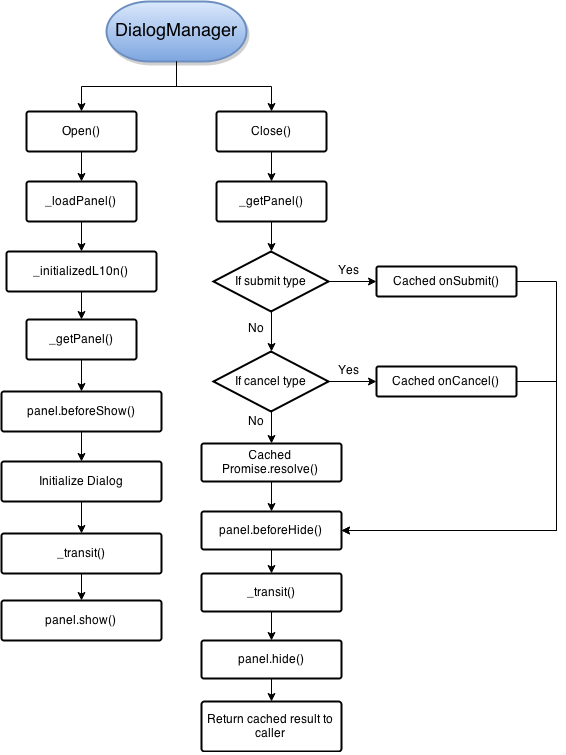
Call Panel
Screenshots
Call Panel
Introduction
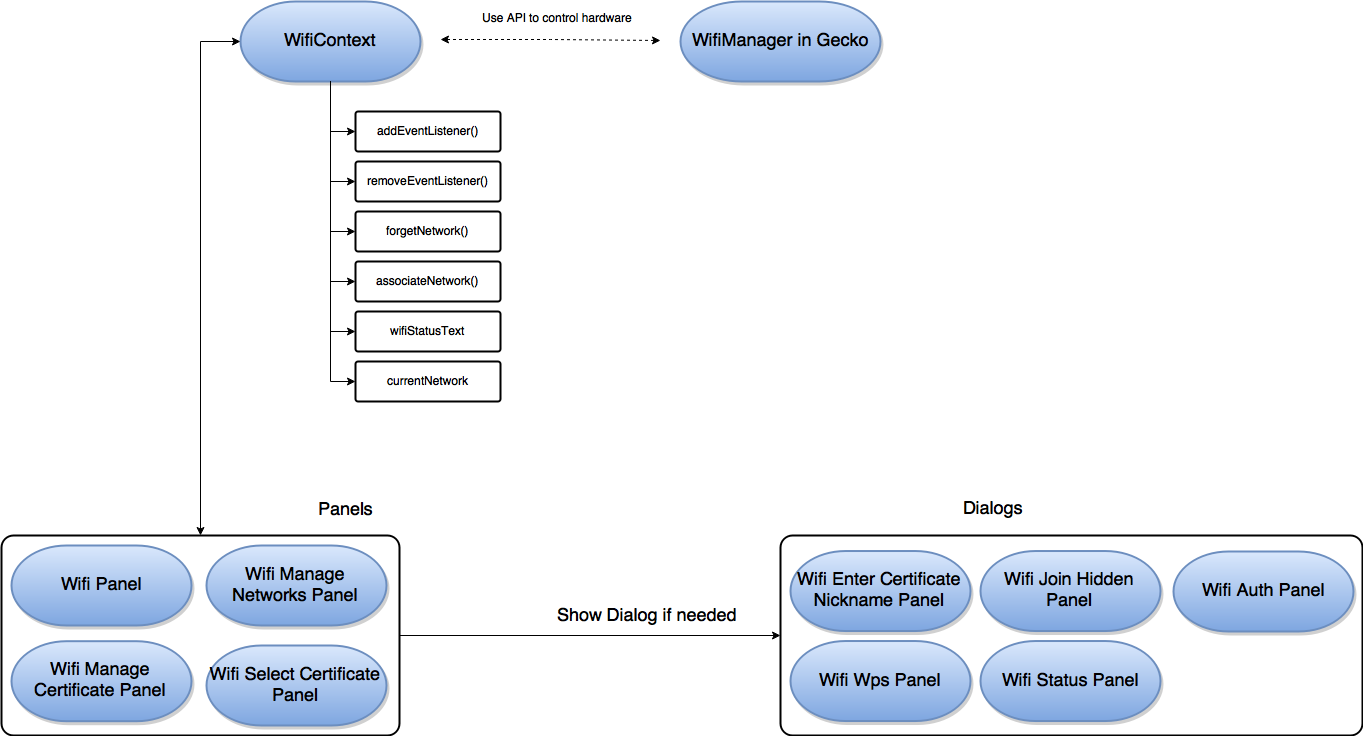
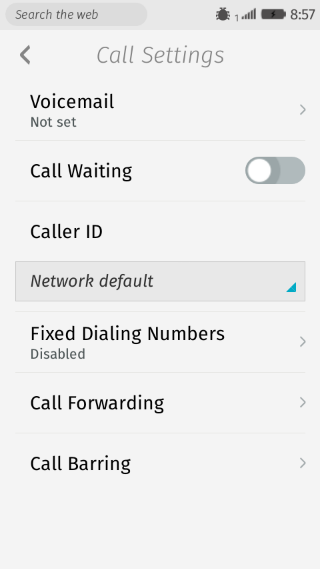
Call Settings is one of the most important panel that can let users highly customize their own call related settings like Call Waiting, Call Forwarding … etc. (We will cover each part later) Based on the screenshot above, you can see that for this panel, it’s more like an entry point for every panel and also it will display some useful information taken from hardware.
But when you navigate from this panel to others and navigate back, you may notice that some menu items are disabled at first and you can’t manipulate that. This is not a bug but also quite a feature. By doing so, we can make sure that each time when displaying them, we will always use latest value from hardware to make sure we won’t display some outdated information to mislead users.
Call Voice Mail Settings Panel (Dialog)
Screenshots
Call Voicemail Panel
Introduction
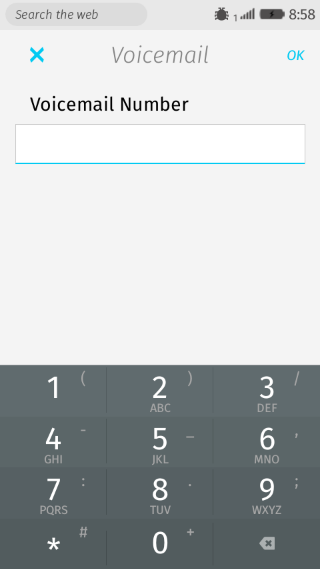
For every simcard, there must be a special number that you can dial to set your voicemail number and this is why we need this dialog in Settings App. When showing this dialog, it will try to get preset voicemail number in mozSettings db and show it at first. Here, you may get confused why it can get the right number from db, this is because in settings/js/panels/call/panel.js, we also need to show voicemail number on the menu item, so when trying to initialize the item, we will check whether there is any provided number from mozVoicemail API and store it into db, so that’s why in this dialog, you can get this value from db.
Call FDN Settings Panel
Screenshots

Call FDN Settings Panel
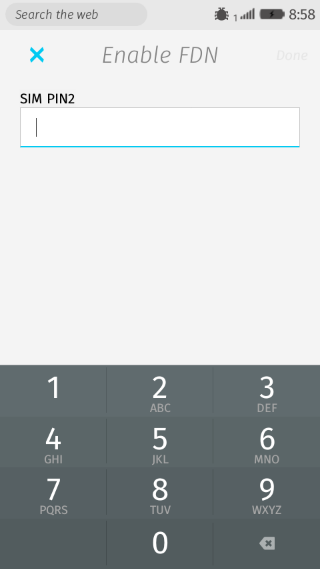
Enable / Disable FDN
Introduction
This panel is also an entry point that we can set settings related to Fixed Dialing Numbers. Here, we provide a toggle that you can enable / disable this feature. When clicking on the toggle, it will trigger DialogService to show SimpinDialog which is responsible for all Simpin related operations. This feature will only be enabled / disabled when you successfully type your PIN2 correctly in the dialog.
Call FDN List Panel
Screenshots

Call FDN List Panel

Popup menu when clicking on FDN number
Introduction
Here, in this panel, we will list down all preset FDN numbers in the list. When clicking on any number, we will show an popup for it and you can decide whether to call, edit and delete or not. Same with enable FDN, if you are going to do any operation I mentioned, we will use DialogService to show SimpinDialog to confirm this operation.
For any FDN number, they will all be stored inside your simcard. Sometime, based on your simcard, you may have an upper bound for the number of FDN numbers, but this depended on operators so the number may vary. So, if you hit an error message when creating a new number, you may go into this situation.
Call FDN List Add Panel (Dialog)
Screenshots

Call FDN List Add Panel (add mode)
Call FDN List Add Panel (edit mode)
Introduction
When clicking on the Add button in Call FDN List Panel, this dialog will pop up and ask users to input preferred name and number for this set of FDN number. Instead of adding, this dialog is also can be reused for editing. Normally there is no specific validation rules for these two fields in our codes, instead, we will pass wrapped object from FdnContext.createAction and pass it to SimpinDialog, it will directly communicate with operator and if there is any error coming up, we will directly report it and display to users.
Call Forwarding Panel
Screenshots

Call Forwarding Panel
Introduction
Honestly, Call Forwarding can be the most complex panel in Call Settings (especially before it was refactored), so let me briefly tell you a story behind this panel.
When users click on any menu item and type number for any Call Forwarding option (For this part, please check Call Forwarding Details section), after submitting, we can get wrapped results from the dialog and use call/call_forwarding.js to help us handle this object. After doing some tests, it seems that it is not able to do multi tasks when interacting with Gecko’s API (This should be the problem in modem). So, in order to make anything works perfect, we create another module called CallSettingsTaskScheduler (call/call_settings_task_scheduler.js) inherited from TaskScheduler (modules/base/task_scheduler.js).
TaskScheduler is obvious responsible for handling different tasks and make sure they are all scheduled and can be executed one by one without conflicting each other. While for CallSettingsTaskScheduler, it is just an extended class with some customized TASK_TYPE and error handling.
So back to topic, because we aren’t able to do more than one request on modem each time, we need the help from task scheduler to achieve this. This operation includes get and set, so they all should be scheduled. If we don’t do this in order, modem will directly throw out errors and our request would be dropped and this would make our state inconsistent with hardware.
In addition to this, there is also another special feature that TaskScheduler provides – if there is another same-type task coming up, we will remove queued same-type task and push the new on in the array. By doing so, we can make sure we won’t send outdated request and would always keep the latest one.
And for UI, when modem is busy on handling our operation, we should disable all UIs while normal, we should make them back. So, in panel, we will observe CallForwarding’s internal _state to lock / unlock UI.
For anything else, please check our script.
Call Forwarding Details Panel (Dialog)
Screenshots

Call Forwarding Details Panel (Dialog)
Introduction
This is the dialog that you can set any number on each Call Forwarding option. Right now, because we do support 4 different options for Call Forwarding but with the same UI, we will reuse this dialog for all of them instead of duplicating many codes. But basically, there is no much logics hidden in this dialog and all what it does is pass the result back to Call Forwarding Panel (Caller) and the caller will do following operations based on returned values.
For more details about how Call Forwarding works internally, please check Call Forwarding Panel section for more details.
Call Barring Panel
Screenshots
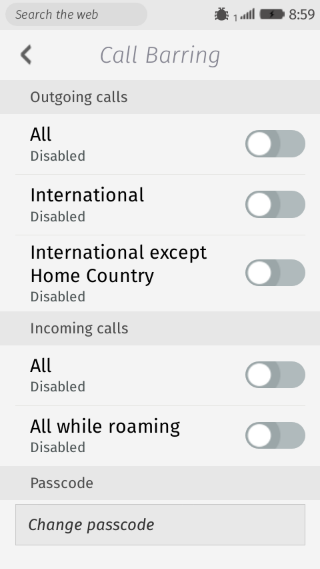
Call Barring Panel
Introduction
In this panel, you can restrict certain types of outgoing calls and incoming calls. There are no special logics handled in this panel and this can be treated as a toggle that helps you customize your Call settings.