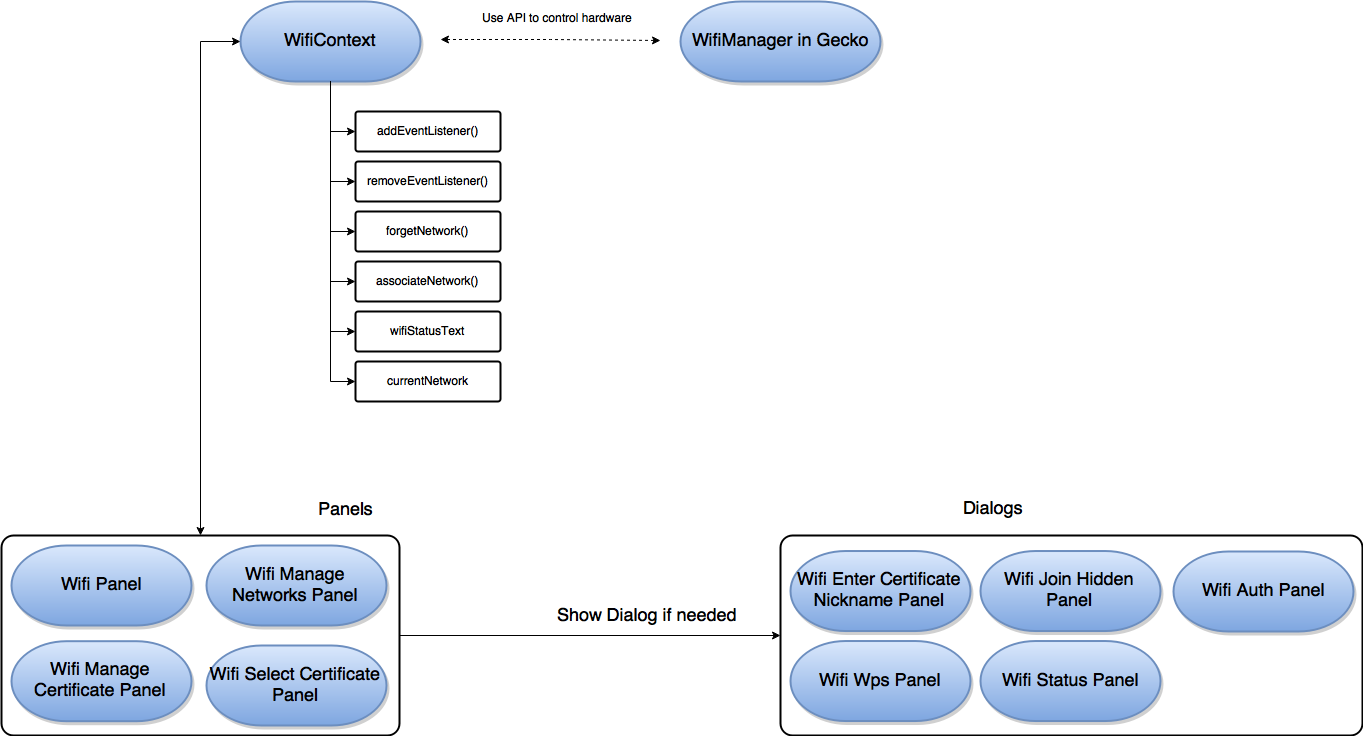
Wifi
Flowchart
Wifi Panel
Screenshot

Wifi Panel (A)

Wifi Panel (B)
Introduction
Wifi panel is the main entry point for the other dialogs / panels. As you may see on the screenshot above, in this panel, users can turn on / off Wifi, decide which AP to connect with and manage certificates or whatever settings related to Wifi.
If you check settings/js/panels/wifi/, you will notice a script which is called wifi_network_list.js. This script is so important that we will use it to generate a list of APs that users can interact with. For example, if you click on any listed AP, it will automatically check its own encryption to show which kind of dialog or just connect to that AP directly.
In addition to this, it will also automatically check its current status from Gecko to see whether it should update its signal / wording … etc. By doing so, we encapsulate all logics within this list and caller doesn’t have to know these details when using it.
Wifi WPS Panel (Dialog)
Screenshot
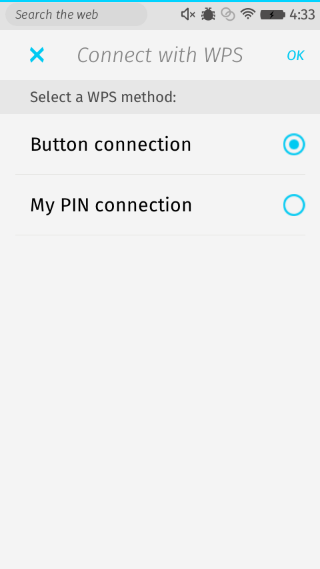
Wifi WPS Panel
Introduction
WPS is another way to connect to AP but this needs some special support from it to make the functionality work. If your AP does support this, users can click on Connect with WPS button to select which way to use to connect with WPS.
From Gaia side, there is no much works here and we simply provide a basic UI for users to choose and configure. So for more details, please go check Gecko’s source code for this part.
Wifi Status Panel (Dialog)
Screenshot
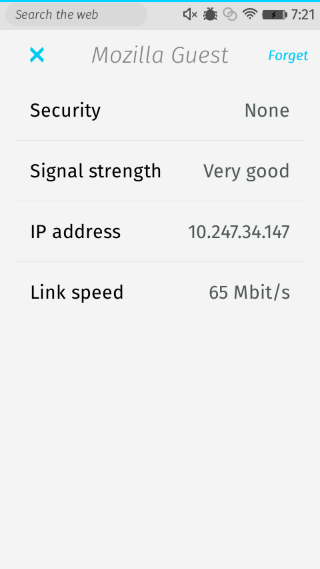
Wifi Status Panel
Introduction
When clicking on connected AP in Wifi Panel, this dialog would be popped up to tell users all needed information about this AP including Security, Signal strength, IP address and Link Speed. In addition to this, you can also forget this AP by clicking right-up button.
Wifi Auth Panel (Dialog)
Screenshot

Wifi Auth Panel
Introduction
If users click on non-connected and encrypted AP from Wifi panel, we will pop up Wifi Auth Panel to users. Compared with non-encrypted AP, normally users have to type password or do some extra pre-settings to connect to this AP.
Wifi Manage Networks Panel
Screenshot

Wifi Manage Networks Panel
Introduction
In this panel, we will list down all connected AP here. If users click on the item, the confirm pop-up will be shown to double confirm whether they really want to remove forget connected AP or not. So for this panel’s code, there is no much complex works but only some UI related stuffs.
Wifi Join Hidden Panel (Dialog)
Screenshot

Wifi Join Hidden Panel
Introduction
This panel is pretty simple enough and it will transform all user’s input into a recognizable object for WifiManager. But there is one thing that should be noticed. Because there are some shared UI / logics for users to select security, EAP method … etc across panels (Wifi Auth Panel & Wifi Join Hidden Panel), we have to use a shared script to control them.
But, sadly, because there are still some minor difference between these two pages, in shard script, we will check some element’s existence before manipulating. So please remember to double check UI codes and shard script for this part before adding new rules. Otherwise, you may break another panel.
Wifi Manage Certificates Panel
Screenshot
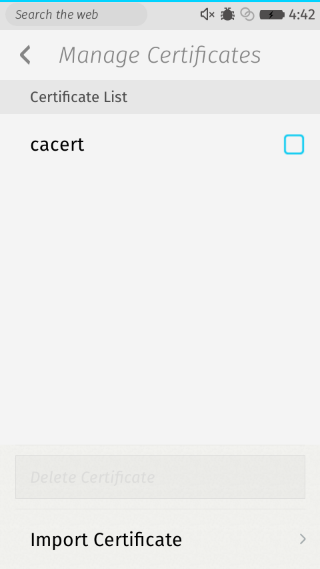
Wifi Manage Certificates Panel
Introduction
If users are trying to connect with AP with WPA-EAP encryption, under some special EAP methods, they need users to provide needed Server Certificates and User Certificates for authentications.
So, if users are trying to connect to AP with these EAP methods, they have to go to this panel and import needed certificates first, otherwise, we can’t find out needed certificates when users are trying to join hidden network.
Wifi Select Certificate File Panel
Screenshot

Wifi Select Certificate File Panel
Introduction
In this panel, we will list down all possible certificates from SD card and present them to users. When clicking on these items, we will redirect them to Wifi Enter Certificate Nickname Panel.
Wifi Enter Certificate Nickname Panel (Dialog)
Screenshot
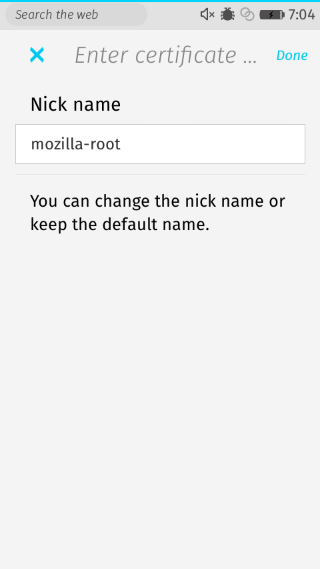
Wifi Enter Certificate Nickname Panel
Introduction
After selecting needed certificate from Wifi Select Certificate File Panel, users will be redirected to this dialog. In this dialog, users can decide whether to rename this certificate or not. Interestingly, if you already have one certificate named with the same name, you are not allowed to name it again because Gecko would throw out some error in this special case.